Apache 发布指南
本文以发布 1.1.2 Apache版本为示例。如果是非Apache版本的发布指引见 详细信息见 https://incubator.apache.org/guides/releasemanagement.html
理解 Apache 发布的内容和流程 Source Release 是 Apache 关注的重点,也是发布的必须内容;而 Binary Release 是可选项, 请参考以下链接,找到更多关于 ASF 的发布指南:
Apache的maven和SVN仓库都会使用到GPG签名来验证物料文件的合法性
1 工具准备#
注意
当本次发布者是首次进行发布时需要
主要包括签名工具GnuPG、Maven 仓库认证相关准备
1.1 安装GPG#
(以Window系统为例,如果有安装过git客户端,gpg可能已经存在,无需再次安装)
在GnuPG官网下载二进制安装包(GnuPG binary releases)。目前最新版本为Gpg4win-3.1.16 2021-06-11 下载后请先完成安装操作 注:GnuPG的1.x版本和2.x版本的命令有细微差别,下列说明以2.2.28为例 安装后gpg命令添加至系统环境变量且可用
#检查版本,应该为2.xgpg --version 1.2 用gpg生成key#
需要注意以下几点:
- 使用的邮箱应该是apache邮箱
- 名字最好使用拼音或者英文,否则会出现乱码
根据提示,生成 key
$ gpg --full-gen-keygpg (GnuPG) 2.2.28; Copyright (C) 2021 g10 Code GmbHThis is free software: you are free to change and redistribute it.There is NO WARRANTY, to the extent permitted by law.
Please select what kind of key you want:   (1) RSA and RSA (default)   (2) DSA and Elgamal   (3) DSA (sign only)   (4) RSA (sign only)  (14) Existing key from cardYour selection? 1 #这里输入1RSA keys may be between 1024 and 4096 bits long.What keysize do you want? (3072) 4096 #这里输入4096Requested keysize is 4096 bitsPlease specify how long the key should be valid.         0 = key does not expire      <n>  = key expires in n days      <n>w = key expires in n weeks      <n>m = key expires in n months      <n>y = key expires in n yearsKey is valid for? (0) 0 #这里输入0Key does not expire at allIs this correct? (y/N) y #这里输入y
GnuPG needs to construct a user ID to identify your key.
Real name: mingXiao #这里输入拼英或则英文名Email address: xiaoming@apache.org #这里输入apache的邮箱地址Comment: for apache release create at 20211110  #这里输入一些注释,可以为空You selected this USER-ID:    "mingXiao (for apache release create at 20211110) <xiaoming@apache.org>"
Change (N)ame, (C)omment, (E)mail or (O)kay/(Q)uit? O #这里输入OWe need to generate a lot of random bytes. It is a good idea to performsome other action (type on the keyboard, move the mouse, utilize thedisks) during the prime generation; this gives the random numbergenerator a better chance to gain enough entropy.
# 此时会弹出对话框,要求为这个gpg输入密钥,需要记住,后续发布会用到。┌──────────────────────────────────────────────────────┐│ Please enter this passphrase to protect your new key ││                                                      ││ Passphrase: _______不能少于8位______________          ││ Repeat:     _______________________________          ││                      <OK>          <Cancel>          │└──────────────────────────────────────────────────────┘#输入秘钥完毕后 需要执行一定的随机动作来生成加密素数,创建好后,会输出以下信息gpg: key 1AE82584584EE68E marked as ultimately trustedgpg: revocation certificate stored as 'C:/Users/xxx/AppData/Roaming/gnupg/openpgp-revocs.d\E7A9B12D1AC2D8CF857AF5851AE82584584EE68E.rev'public and secret key created and signed.
pub rsa4096 2021-11-10 [SC] E7A9B12D1AC2D8CF857AF5851AE82584584EE68Euid mingXiao (for apache release create at 20211110) <xiaoming@apache.org>sub rsa4096 2021-11-10 [E]1.3 上传生成的key到公共服务器#
$ gpg  --keyid-format SHORT --list-keys pub   rsa4096/584EE68E 2021-11-10 [SC] #584EE68E就是key id      E7A9B12D1AC2D8CF857AF5851AE82584584EE68Euid         [ultimate] mingXiao (for apache release create at 20211110) <xiaoming@apache.org>sub   rsa4096/399AA54F 2021-11-10 [E]
# 通过key id发送public key到keyserver $ gpg --keyserver keyserver.ubuntu.com --send-key 584EE68E# 其中,keyserver.ubuntu.com为挑选的keyserver,建议使用这个, 因为Apache Nexus校验时是使用的这个keyserver1.4 查看key是否创建成功#
验证是否同步到公网,大概需要一分钟才能查到,未成功可以进行上传重试几次
方式一#584EE68E是对应的key id$ gpg --keyserver keyserver.ubuntu.com --recv-keys 584EE68E
#结果如下gpg: key 1AE82584584EE68E: "mingXiao (for apache release create at 20211110) <xiaoming@apache.org>" not changedgpg: Total number processed: 1gpg:              unchanged: 1
方式二直接访问https://keyserver.ubuntu.com/ 输入用户名mingXiao搜索查询结果1.5 将gpg公钥加入Apache SVN项目仓库的KEYS文件#
这个步骤需要使用SVN,请先下载安装SVN客户端,Apache使用svn托管项目的发布内容
- Linkis DEV分支 https://dist.apache.org/repos/dist/dev/incubator/linkis
- Linkis Release分支 https://dist.apache.org/repos/dist/release/incubator/linkis
1.5.1 在dev分支中添加公钥到KEYS#
$ mkdir -p linkis_svn/dev$ cd linkis_svn/dev
$ svn co https://dist.apache.org/repos/dist/dev/incubator/linkis # 这个步骤比较慢,会把所有版本都拷贝下来,如果网断了,用svn cleanup删掉锁,重新执行一下,会断点续传$ cd linkis_svn/dev/linkis
# 追加你生成的KEY到文件KEYS中, 追加后最好检查一下是否正确$ (gpg --list-sigs YOUR_NAME@apache.org && gpg --export --armor YOUR_NAME@apache.org) >> KEYS
# 第一次提交KEY文件,需要先将KEYS文件加入版本控制   svn add KEYS
#提交到SVN$ svn ci -m "add gpg key for YOUR_NAME" 1.5.2 在release分支中添加公钥到KEYS#
$ mkdir -p linkis_svn/release$ cd linkis_svn/release
$ svn co https://dist.apache.org/repos/dist/release/incubator/linkis# 这个步骤比较慢,会把所有版本都拷贝下来,如果网断了,用svn cleanup删掉锁,重新执行一下,会断点续传
$ cd  linkis# 追加你生成的KEY到文件KEYS中, 追加后最好检查一下是否正确$ (gpg --list-sigs YOUR_NAME@apache.org && gpg --export --armor YOUR_NAME@apache.org) >> KEYS
# 第一次提交KEY文件,需要先将KEYS文件加入版本控制 svn add KEYS #提交到SVN$ svn ci -m "add gpg key for YOUR_NAME" 1.6 配置apache maven地址和用户密码设置#
mvn密码机制加密后的密码获取步骤
- step1 生成master密码
$ mvn --encrypt-master-password <apache password>
- step2 配置master密码 新增文件 ${user.home}/.m2/settings-security.xml 配置step1创建的密码
<settingsSecurity> <master>{jSMOWnoPFgsHVpMvz5VrIt5kRbzGpI8u+9EF1iFQyJQ=}</master></settingsSecurity>- step3 生成最终加密密码
mvn --encrypt-password <apache password>- step4 将step3生成的最终密码填写到下面的
$encryptPassword中
详细的加密设置可参考这里
在maven的配置文件~/.m2/settings.xml中,则添加下面的<server>项
<?xml version="1.0" encoding="UTF-8"?><settings xsi:schemaLocation="http://maven.apache.org/SETTINGS/1.1.0 http://maven.apache.org/xsd/settings-1.1.0.xsd" xmlns="http://maven.apache.org/SETTINGS/1.1.0"    xmlns:xsi="http://www.w3.org/2001/XMLSchema-instance">  <servers>    <!-- Apache Repo Settings -->    <server>        <id>apache.snapshots.https</id>         <!-- APACHE LDAP 用户名 -->         <username>$ApacheId</username>         <!--APACHE LDAP 密码(使用经过mvn密码机制加密后的密码)-->        <password>$encryptPassword</password>    </server>    <server>        <id>apache.releases.https</id>        <username>$ApacheId</username>        <password>$encryptPassword</password>    </server>  </servers>
<profiles> <profile> <id>apache-release</id> <properties> <!-- Your GPG Keyname here --> <gpg.keyname>你的KEYID</gpg.keyname> <!-- Use an agent: Prevents being asked for the password during the build --> <gpg.useagent>true</gpg.useagent> <gpg.passphrase>你的私钥的密码</gpg.passphrase> </properties> </profile> </profiles></settings>注意
如果后续执行2.3步进行deploy时,报401,可以运行mvn help:effective-settings 检查下生效的maven settings.xml配置,
可以尝试将上述的账户密码配置再自己maven环境的conf配置中,如:D:\apache-maven-3.3.9\conf\setting.xml
2 准备物料包&Apache Nexus发布#
2.1 准备分支/Tag/Release Notes#
从待发布分支拉取新分支作为待发布分支,如现在要发布${release_version}版本,则从待发布分支拉取新分支release-${release_version}-${condition_version},此后所有操作都在release-${release_version}-${condition_version}分支上进行,在最终发布完成后,合入主干master分支。
step1 基于待发布的开发分支,创建release-${release_version}-rc分支
如当前开发的源码分支为dev-1.1.2,需要发布1.1.2的版本,创建分支:release-1.1.2-rc1

step2 创建新的github release
进入到创建页面 https://github.com/apache/incubator-linkis/releases/new
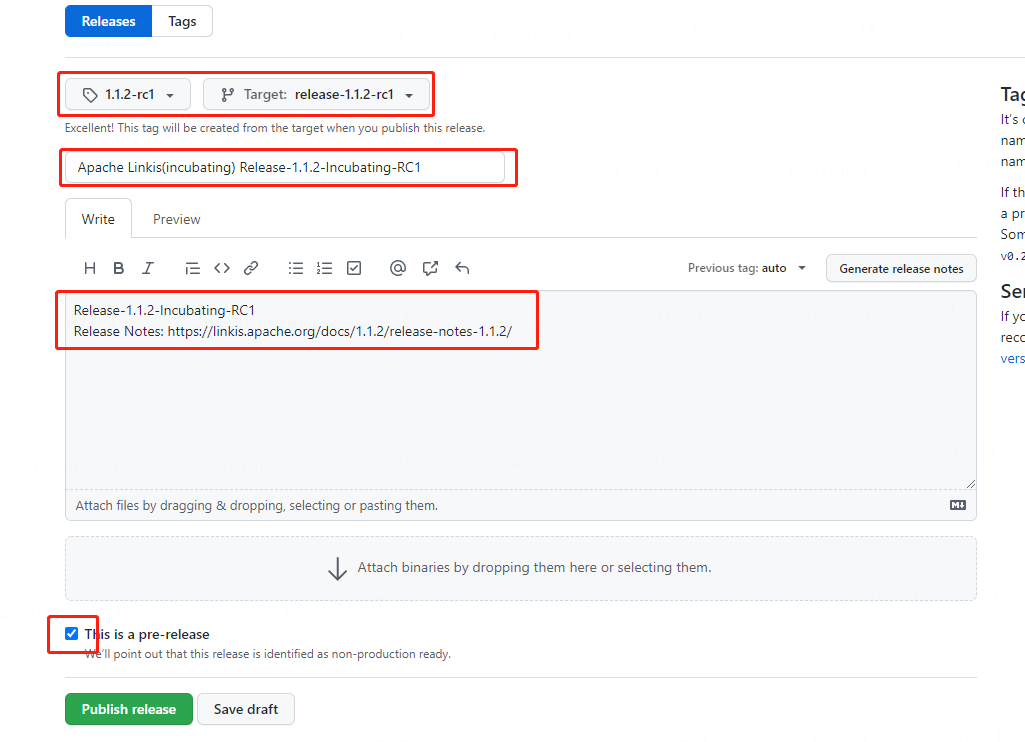
基于之前release-1.1.2-rc1分支创建名为1.1.2-rc1的tag,填写标题Apache Linkis(incubating) Release-1.1.2-incubating-RC1,并勾选This is a pre-release,将该版本的release notes链接写入
step3 检查

step4 clone对应的release分支到本地
#-b release-1.12-rc1 指定clone分支 -c(config) 指定使用的配置 core.autocrlf=false 关闭自动换行符的转换 git clone -b release-1.1.2-rc1 -c core.autocrlf=false git@github.com:apache/incubator-linkis.git
注意
Window下,安装git客户端,默认情况下,git clone 项目到Windows本地,git会强制将文件的换行符转成CTRL,而不是LF。 这会导致window下打的发布包 ,对于shell脚本在linux下直接运行,会出现换行符问题 ,clone时通过
-c core.autocrlf=false关闭自动转换主仓库apache/incubator-linkis准备好发布分支/tag/release notes后,请克隆源码对应的发布分支release-1.1.2-rc1,进行下列步骤
2.2 版本号确认#
如果版本号不正确,需要统一修改版本号
$ mvn versions:set -DnewVersion=1.1.2 #修改最外层pom.xml中的配置 <linkis.version>1.1.2</linkis.version>检查代码是否正常,包括版本号,编译成功、单元测试全部成功,RAT检查成功等等
#build检查$ mvn clean install -Dmaven.javadoc.skip=true#RAT LICENSE检查
#正常5分钟内可以执行完,如果长时间未执行结束,请检查是否由于编译等动作,增加了额外不必要检查的文件$ mvn apache-rat:check
#无异常后 检查所有的rat文件 $ find ./ -name rat.txt -print0 | xargs -0 -I file cat file > merged-rat.txt若check异常,请检查是否由于编译等动作,增加了额外不必要检查的文件,可以移除掉。 rat check的白名单文件配置在外层pom.xml中的apache-rat-plugin插件配置中。
检查merged-rat.txt中所有license信息,注意Binaries 和Archives文件是否为0。
Notes: 0Binaries: 0Archives: 00 Unknown Licenses2.3 发布jar包到Apache Nexus仓库#
# 开始编译并上传 耗时大概在1h40min左右 -DretryFailedDeploymentCount 失败自动重试此时$ mvn -DskipTests deploy -Prelease -Dmaven.javadoc.skip=true -DretryFailedDeploymentCount=10注意
出现下列情况,请先登陆https://repository.apache.org/#stagingRepositories drop掉异常的任务,重新执行本步骤。
- 若使用网络代理或则请求方ip变化,可能会导致apache maven 拆分为了多次上传记录,最好关闭网络代理
- 若出现超时,需要重新deploy
上述命令执行成功后,待发布版本包会自动上传到Apache的临时筹备仓库(staging repository)。所有被deploy到远程maven仓库的Artifacts都会处于staging状态,访问https://repository.apache.org/#stagingRepositories, 使用Apache的LDAP账户登录后,就会看到上传的版本,Repository列的内容即为${STAGING.REPOSITORY}。 点击Close来告诉Nexus这个构建已经完成,只有这样该版本才是可用的。 如果电子签名等出现问题,Close会失败,可以通过Activity查看失败信息。
同时也生成了二进制文件 linkis-dist/target/apache-linkis-1.1.2-incubating-bin.tar.gz
步骤2.4-3.3执行命令,合并在release.sh脚本中,也可以通过release.sh脚本(见文末附录)来执行
2.4 打包源码#
$ mkdir -p dist/apache-linkis#基于release-1.1.2-rc1分支打包源码的tar.gz物料 #--prefix=apache-linkis-1.1.2-incubating-src/  注意带上`/`  压缩包解压后会是在apache-linkis-1.1.2-incubating-src文件夹中#会生成一个pax_global_header文件 记录的是commitid信息,不加--prefix会导致解压后pax_global_header 和源码文件同级目录
$ git archive --format=tar.gz --output="dist/apache-linkis/apache-linkis-1.1.2-incubating-src.tar.gz" --prefix=apache-linkis-1.1.2-incubating-src/ release-1.1.2-rc12.5 拷贝二进制文件#
步骤2.3执行后,二进制文件已经生成,位于linkis-dist/target/apache-linkis-1.1.2-incubating-bin.tar.gz
$ cp linkis-dist/target/apache-linkis-1.1.2-incubating-bin.tar.gz dist/apache-linkis2.6 打包前端管理台#
2.6.1 安装Node.js#
将Node.js下载到本地,安装即可。下载地址:http://nodejs.cn/download/ (建议使用node v14版本) 该步骤仅第一次使用时需要执行。
2.6.2 安装依赖包#
在终端命令行中执行以下指令:
#进入项目WEB根目录$ cd incubator-linkis/linkis-web#安装项目所需依赖$ npm install该步骤仅第一次使用时需要执行。
2.6.3 打包前端管理台项目#
在终端命令行执行以下指令对项目进行打包,生成压缩后的部署安装包。 检查linkis-web/package.json,linkis-web/.env文件,检查前端管理台版本号是否正确。
$ npm run build上述命令执行成功后,会生成前端管理台安装包 apache-linkis-${version}-incubating-web-bin.tar.gz
注意:
1.Windows下npm install 步骤报错:Error: Can't find Python executable "python", you can set the PYTHON env variable安装windows-build-tools (管理员权限)$ npm install --global --production windows-build-tools安装node-gyp$ npm install --global node-gyp
2.如果编译失败 请按如下步骤清理后重新执行#进入项目工作目录,删除 node_modules$ rm -rf node_modules#删除 package-lock.json$ rm -rf package-lock.json#清除 npm 缓存$ npm cache clear --force#重新下载依赖$ npm install
2.6.4 拷贝前端管理台安装包#
步骤2.6.3执行后,前端管理台安装包已经生成,位于 linkis-web/apache-linkis-1.1.2-incubating-web-bin.tar.gz
$ cp linkis-web/apache-linkis-1.1.2-incubating-web-bin.tar.gz dist/apache-linkis2.7 对源码包/二进制包进行签名/sha512#
$ cd  dist/apache-linkis
# 如果是window cmd 命令无法识别时,可以单独计算签名 如:gpg --armor --output apache-linkis-1.1.2-incubating-src.tar.gz.asc --detach-sig apache-linkis-1.1.2-incubating-src.tar.gz$ for i in *.tar.gz; do echo $i; gpg --armor --output $i.asc --detach-sig $i ; done # 计算签名
$ for i in *.tar.gz; do echo $i; sha512sum $i > $i.sha512 ; done # 计算SHA5122.8 检查生成的签名/sha512是否正确#
验证签名是否正确如下:
$ cd dist/apache-linkis$ for i in *.tar.gz; do echo $i; gpg --verify $i.asc $i ; done出现类似以下内容则说明签名正确,关键字:Good signature
apache-linkis-xxx-incubating-src.tar.gz gpg: Signature made XXXX gpg: using RSA key XXXXX gpg: Good signature from "xxx @apache.org>"验证sha512是否正确如下:
$ cd dist/apache-linkis$ for i in *.tar.gz; do echo $i; sha512sum --check $i.sha512; done
详细验证流程可以参见验证候选版本
3 发布Apache SVN仓库#
3.1 检出Linkis发布目录#
从Apache SVN dev目录检出Linkis发布目录。
$ svn co https://dist.apache.org/repos/dist/dev/incubator/linkis dist/linkis_svn_dev
3.2 将待发布的内容添加至SVN目录#
创建版本号目录,以${release_version}-${RC_version}方式命名,RC_version 从1开始,即候选版本从RC1开始,在发布过程中,存在问题导致投票不通过,需要修正,则需要迭代RC版本,RC版本号要+1。
比如:1.1.2-RC1版本进行投票,若投票通过,无任何问题,则这个RC1版本物料作为最终版本物料发布。
若存在问题(linkis/incubator社区投票时,投票者会严格检查各种发布要求项以及合规问题),需要修正,则修正后,再重新发起投票,下次投票的候选版本为1.1.2-RC2。
$ mkdir -p dist/linkis_svn_dev/1.1.2-RC1将源码包、二进制包和Linkis可执行二进制包添加至SVN工作目录。
$ cp -f dist/apache-linkis/* dist/linkis_svn_dev/1.1.2-RC1
3.3 提交Apache SVN#
$ cd  dist/linkis_svn_dev/
# 检查svn状态$ svn status# 添加到svn版本$ svn add 1.1.2-RC1$  status#提交至svn远程服务器 $ svn commit -m "prepare for 1.1.2-RC1"
若svn命令出现中文乱码,可尝试设置编码格式(设置编码格式:export LANG=en_US.UTF-8)。
4 验证Release Candidates#
详细可以参见How to Verify release
5 发起投票#
tip
发送邮件时请使用您的 apache.org 邮箱发送,并使用纯文本格式,详细见附录-邮件切换纯文本格式
注意
所有指向校验和、签名和公钥的链接都必须引用Apache主网站https://downloads.apache.org/并应使用https://(SSL)。例如:https://downloads.apache.org/incubator/linkis/KEYS
目前是用的DISCLAIMER-WIP免责申明,请在邮件中加入此说明As the DISCLAIMER-WIP shows....。如果后续解决了WIP待处理的问题后,可以去掉。WIP的使用,详细可见 https://issues.apache.org/jira/browse/LEGAL-469
Linkis 仍在孵化阶段,需要进行两次投票
- Linkis 社区投票,发送邮件至:
dev@linkis.apache.org - incubator 社区投票,发送邮件至:
general@incubator.apache.orgLinkis毕业后,只需要在Linkis社区投票 - 在社区投票的邮件正文中的${Linkis Release Manager},填写负责本次发布的人员,一般是邮件发送人,如
Shuai Di
5.1 Linkis 社区投票阶段#
Linkis 社区投票,发起投票邮件到
dev@linkis.apache.org。PMC需要先按照文档检查版本的正确性,然后再进行投票。 经过至少72小时并统计到3个+1PMC member票后,才可进入下一阶段的投票。宣布投票结果,发起投票结果邮件到
dev@linkis.apache.org。
5.1.1 Linkis 社区投票模板#
参考示例:[VOTE] Release Apache Linkis (Incubating) 1.1.2-RC2 https://lists.apache.org/thread/8j8f8vqotpg4f2kjwq3gg436vtx40p20
邮件标题:[VOTE] Release Apache Linkis (Incubating) ${release_version} ${rc_version}
邮件正文:
Hello Linkis Community,
    This is a call for vote to release Apache Linkis (Incubating) version ${release_version}-${rc_version}.
    Release notes:        https://linkis.apache.org/download/release-notes-${release_version}
    The release candidates:        https://dist.apache.org/repos/dist/dev/incubator/linkis/${release_version}-${rc_version}/
    Maven artifacts are available in a staging repository at:        https://repository.apache.org/content/repositories/orgapachelinkis-{staging-id}
    Git tag for the release:        https://github.com/apache/incubator-linkis/tree/${release_version}-${rc_version}
    Keys to verify the Release Candidate:        https://downloads.apache.org/incubator/linkis/KEYS
    GPG user ID:    ${YOUR.GPG.USER.ID}
    The vote will be open for at least 72 hours or until necessary number of votes are reached.
    Please vote accordingly:
    [ ] +1 approve    [ ] +0 no opinion    [ ] -1 disapprove with the reason
    Checklist for reference:
    [ ] Download links are valid.    [ ] Checksums and PGP signatures are valid.    [ ] Source code distributions have correct names matching the current release.    [ ] LICENSE and NOTICE files are correct for each Linkis repo.    [ ] All files have license headers if necessary.    [ ] No unlicensed compiled archives bundled in source archive.
    More detail checklist  please refer:        https://cwiki.apache.org/confluence/display/INCUBATOR/Incubator+Release+Checklist    Steps to validate the release,Please refer to:         https://linkis.apache.org/community/how-to-verify
Thanks,${Linkis Release Manager}5.1.2 关闭投票线程#
如果投票已达到所需票数后,进行结果统计前,需要直接回复投票邮件,说明关闭本次投票线程
Hi,
Thanks, everyone, I will close
this vote thread and the results will be tallied.
Best wishes!
${Linkis Release Manager}5.1.3 取消投票(如果需要取消)#
如果反馈了一些严重问题,需要修复后,重新发布,则需要取消投票,发布经理需要新起取消投票邮件 并进行说明
邮件标题:[CANCEL][VOTE] Release Apache Linkis (Incubating) ${release_version} ${rc_version}
邮件正文:Hello Linkis Community,
    I'm cancelling this vote [投票链接] because of license issues. I'll fix them and start    the round 2 vote process.        The detail of the modifications are as follows:        1. Remove the file xxx    2. Removes the files be built from shenyu-dashboard        Thanks a lot for all your help.
${Linkis Release Manager}5.1.4 宣布投票结果模板#
参考示例:[RESULT][VOTE] Release Apache Linkis (Incubating) 1.1.2-RC2 https://lists.apache.org/thread/gh1b1t3cjom8bq9o3xbntbjgrkp0vly3
备注:该邮件thread地址,可以通过访问https://lists.apache.org/list?dev@linkis.apache.org 这个页面查到(注意加载时间可能会比较长),然后选择相应邮件,点击进去后即可生成thread链接;
邮件标题:[RESULT][VOTE] Release Apache Linkis (Incubating) ${release_version} ${rc_version}
邮件正文:Hello Apache Linkis PPMC and Community,
    The vote closes now as 72hr have passed. The vote PASSES with
    xx (+1 binding) votes from the PPMC,    xx (+1 binding) votes from the IPMC,    xx (+1 non-binding) votes from the rest of the developer community,    and no further 0 or -1 votes.
    The vote thread: {vote_mail_address}
    I will now bring the vote to general@incubator.apache.org to get approval by the IPMC.    If this vote passes also, the release is accepted and will be published.
Thank you for your support.${Linkis Release Manager}注:
- PPMC:podling Project Management Committee (PPMC) linkis的ppmc
- IPMC: Incubator Project Management Committee (IPMC) 一般是孵化社区的PMC,linkis的导师都是这个角色
5.2 Incubator 社区投票阶段#
- Incubator社区投票,发起投票邮件到
general@incubator.apache.org,需至少3个+1IPMC Member投票,才可进入下一阶段。 - 宣布投票结果,发起投票结果邮件到
general@incubator.apache.org并抄送至dev@linkis.apache.org。
5.2.1 Incubator 社区投票模板#
参考示例:[VOTE] Release Apache Linkis (Incubating) 1.1.2-RC2 https://lists.apache.org/thread/9jr6hsf53jmwvnkh8nkt6spwcwc1q42j
邮件标题:[VOTE] Release Apache Linkis(Incubating) ${release_version} ${rc_version}
邮件正文:
Hello Incubator Community,
    This is a call for a vote to release Apache Linkis(Incubating) version    ${release_version} ${rc_version}
    The Apache Linkis community has voted on and approved a proposal to release    Apache Linkis(Incubating) version ${release_version} ${rc_version}
    We now kindly request the Incubator PMC members review and vote on this    incubator release.
    Linkis community vote thread:        • [Linkis社区投票链接]
    Vote result thread:        • [Linkis社区投票结果链接]
    The release candidate:        • https://dist.apache.org/repos/dist/dev/incubator/linkis/${release_version}-${rc_version}/
    Git tag for the release:        • https://github.com/apache/incubator-linkis/tree/${release_version}-${rc_version}
    Release notes:        • https://linkis.apache.org/download/release-notes-${release_version}
    The artifacts signed with PGP key [填写你个人的KEY], corresponding to [填写你个人的邮箱], that can be found in keys file:        • https://downloads.apache.org/incubator/linkis/KEYS
    The vote will be open for at least 72 hours or until necessary number of votes are reached.
    Please vote accordingly:
    [ ] +1 approve    [ ] +0 no opinion    [ ] -1 disapprove with the reason
    More detail checklist  please refer:        • https://cwiki.apache.org/confluence/display/INCUBATOR/Incubator+Release+Checklist
    Steps to validate the release,Please refer to:         • https://linkis.apache.org/community/how-to-verify

Thanks,On behalf of Apache Linkis(Incubating) community
5.2.2 关闭投票线程#
如果投票已达到所需票数后,进行结果统计前,需要直接回复投票邮件,说明关闭本次投票线程
Hi,
Thanks, everyone, I will close
this vote thread and the results will be tallied.
Best wishes!
Apache Linkis(Incubating) community5.2.3 取消投票(如果需要取消)#
如果反馈了一些严重问题,需要修复后,重新发布,则需要取消投票,发布经理需要新起取消投票邮件 并进行说明
邮件标题:[CANCEL][VOTE] Release Apache Linkis (Incubating) ${release_version} ${rc_version}
邮件正文:Hello Incubator Community,
    I'm cancelling this vote [投票链接] because of license issues. I'll fix them and start    the round 2 vote process.        The detail of the modifications are as follows:        1. Remove the file xxx    2. Removes the files be built from shenyu-dashboard        Thanks a lot for all your help.
Apache Linkis(Incubating) community5.2.4 宣布投票结果模板#
参考示例:[RESULT][VOTE] Release Apache Linkis (Incubating) 1.1.2-RC2 https://lists.apache.org/thread/l6xtpt8g1wxwnbotods11fzd1hkoqx63
邮件标题:[RESULT][VOTE] Release Apache Linkis ${release_version} {rc_version}
邮件正文:Hi all
Thanks for reviewing and voting for Apache Linkis(Incubating) ${release_version} {rc_version}release, I am happy to announce the release voting has passed with [投票结果数]binding votes, no +0 or -1 votes. Binding votes are from IPMC
   - xxx   - xxx   - xxx
The voting thread is:[Incubator社区投票链接]
Many thanks for all our mentors helping us with the release procedure, andall IPMC helped us to review and vote for Apache Linkis(Incubating) release. I willbe working on publishing the artifacts soon.
ThanksOn behalf of Apache Linkis(Incubating) community6 正式发布#
6.1 迁移源码与二进制包#
注意
release的分支路径名不能带rc标识
将源码和二进制包从svn的dev目录移动到release目录
#移动源码包与二进制包# 如 svn mv https://dist.apache.org/repos/dist/dev/incubator/linkis/1.2.0-RC1 https://dist.apache.org/repos/dist/release/incubator/linkis/release-1.2.0  -m "transfer packages for ${release_version}-${rc_version}" $ svn mv https://dist.apache.org/repos/dist/dev/incubator/linkis/${release_version}-${rc_version} https://dist.apache.org/repos/dist/release/incubator/linkis/${release_version} -m "transfer packages for ${release_version}-${rc_version}"
# 下面操作 按实际情况 决定是否更新release 分支的key# 清除原有release目录下的KEYS$ svn delete https://dist.apache.org/repos/dist/release/incubator/linkis/KEYS -m "delete KEYS"
# 拷贝dev目录KEYS到release目录$ svn cp https://dist.apache.org/repos/dist/dev/incubator/linkis/KEYS https://dist.apache.org/repos/dist/release/incubator/linkis/ -m "transfer KEYS for ${release_version}-${rc_version}"6.2 确认dev和release下的包是否正确#
- 确认dev下的
${release_version}-${rc_version}已被删除, 如果在正式发布前有多个RC版本,多个RC版本均需要删除 - 删除release目录下 上一个版本的发布包,这些包会被自动保存在这里
#删除前请确认上一个版本发布包已更新至https://downloads.apache.org/incubator/linkis/$ svn delete https://dist.apache.org/repos/dist/release/incubator/linkis/${last_release_version} -m "Delete ${last_release_version}"同步至https://downloads.apache.org/incubator/linkis/ 至少需要1小时
6.3 在Apache Staging仓库发布版本#
- 登录 http://repository.apache.org , 使用Apache账号登录
- 点击左侧的 Staging repositories,
- 搜索 Linkis 关键字,选择你最近上传的仓库,投票邮件中指定的仓库
- 点击上方的
Release按钮,这个过程会进行一系列检查
等仓库同步到其他数据源,一般需要24小时
6.4 更新下载页面#
中英文文档都要更新linkis的官网下载地址应该指向apache的官方地址
等待并确认新的发布版本同步至Apache镜像(https://downloads.apache.org/incubator/linkis/) 后,更新如下页面:
6.5 GitHub 版本发布#
- 合并
${release_version}-RC分支到master分支(如果未合并) - 打正式版本tag,投票过程中的RC版本tag可以移除
- 在 GitHub Releases 页面,更新版本号及版本说明等
7 邮件通知版本发布完成#
请确保Apache Staging仓库已发布成功,一般是在该步骤的24小时后发布邮件
发邮件到 dev@linkis.apache.org 、 announce@apache.org和general@incubator.apache.org
邮件标题:[ANNOUNCE] Apache Linkis (Incubating) ${release_version} available
邮件正文:Hi all,
Apache Linkis (Incubating) Team is glad to announce the new release of Apache Linkis (Incubating) ${release_version}.
Apache Linkis (Incubating) builds a computation middleware layer to decouple the upper applications and the underlying data engines, provides standardized interfaces (REST, JDBC, WebSocket etc.) to easily connect to various underlying engines (Spark, Presto, Flink, etc.), while enables cross engine context sharing, unified job& engine governance and orchestration.
Download Links: https://linkis.apache.org/download/main/
Release Notes: https://linkis.apache.org/download/release-notes-${release_version}
Website: https://linkis.apache.org/
Linkis Resources:- Issue: https://github.com/apache/incubator-linkis/issues- Mailing list: dev@linkis.apache.org
- Apache Linkis (Incubating) Team
8 更新 Clutch Status 的信息#
step1 克隆状态记录的文件
svn co https://svn.apache.org/repos/asf/incubator/public/trunk/content/projects/step2 修改 linkis.xml 中的new信息 增加发布记录信息
<section id="News">      <title>News</title>      <ul><!--    <li>YYYY-MM-DD New committer: Fred Hampton</li>    -->        <li>2021-08-02 Project enters incubation.</li>        <li>2022-02-19 First Apache Linkis release v1.1.2</li>        <li>2022-02-24 New Committer: Chen Xia</li>        <li>2022-04-15 Apache Linkis release v1.1.0</li>
</ul> </section>step3 更新提交后,信息会在这里呈现 https://incubator.apache.org/clutch/linkis.html
附录#
附件1 release.sh#
步骤2.4-3.3执行命令,可以合并在release.sh脚本中
#!/bin/bash## Licensed to the Apache Software Foundation (ASF) under one or more# contributor license agreements.  See the NOTICE file distributed with# this work for additional information regarding copyright ownership.# The ASF licenses this file to You under the Apache License, Version 2.0# (the "License"); you may not use this file except in compliance with# the License.  You may obtain a copy of the License at# http://www.apache.org/licenses/LICENSE-2.0# Unless required by applicable law or agreed to in writing, software# distributed under the License is distributed on an "AS IS" BASIS,# WITHOUT WARRANTIES OR CONDITIONS OF ANY KIND, either express or implied.# See the License for the specific language governing permissions and# limitations under the License.#
# tar source coderelease_version=1.1.2#本次进行的RC版本 格式RCXrc_version=RC1#对应的git 仓库分支git_branch=release-1.1.2-rc1
workDir=$(cd "$(dirname "$0")"; pwd)cd ${workDir}; echo "enter work dir:$(pwd)"
rm -rf dist
mkdir -p  dist/apache-linkis
#step1 打包源码文件git archive --format=tar.gz --output="dist/apache-linkis/apache-linkis-$release_version-incubating-src.tar.gz"  --prefix=apache-linkis-$release_version-incubating-src/   $git_branchecho  "git archive --format=tar.gz --output='dist/apache-linkis/apache-linkis-$release_version-incubating-src.tar.gz' --prefix=apache-linkis-$release_version-incubating-src/   $git_branch"
#step2 拷贝二进制编译包cp  linkis-dist/target/apache-linkis-$release_version-incubating-bin.tar.gz   dist/apache-linkis
#step3 打包web(如果需要发布前端)
cd linkis-web#安装依赖npm installnpm run buildcp  apache-linkis-*-incubating-web-bin.tar.gz  ../dist/apache-linkis
#step4 签名
### 对源码包/二进制包进行签名/sha512cd   ../dist/apache-linkisfor i in *.tar.gz; do echo $i; gpg --armor --output $i.asc --detach-sig $i ; done # 计算签名for i in *.tar.gz; do echo $i; sha512sum  $i > $i.sha512 ; done # 计算SHA512
### 检查生成的签名/sha512是否正确for i in *.tar.gz; do echo $i; gpg --verify $i.asc $i ; donefor i in *.tar.gz; do echo $i; sha512sum --check  $i.sha512; done

#step5 上传至svn
cd ../rm -rf linkis-svn-devsvn co https://dist.apache.org/repos/dist/dev/incubator/linkis   linkis-svn-dev

mkdir -p linkis-svn-dev/${release_version}-${rc_version}cp  apache-linkis/*tar.gz*    linkis-svn-dev/${release_version}-${rc_version}cd  linkis-svn-dev
# 检查svn状态svn status# 添加到svn版本svn add ${release_version}-${rc_version}svn status# 提交至svn远程服务器svn commit -m "prepare for ${release_version} ${rc_version}"
邮件切换纯文本格式#
不要发送纯 HTML 消息;而是发送纯文本(内容类型:文本/纯文本)。发送 HTML 会减少阅读您的电子邮件的人数,并且经常会被apache.org入站垃圾邮件过滤器拒绝。如果您的邮件被退回并且错误消息说垃圾邮件命中包括HTML_MESSAGE,请以纯文本形式重新发送邮件。 更多可以参阅官方邮件规范 https://infra.apache.org/contrib-email-tips
Gmail邮箱切换纯文本格式

QQ邮箱切换纯文本格式
